
 В этой статье опишу как сделать так, чтобы каждый элемент ListBox‘а имел свой ProgressBar.
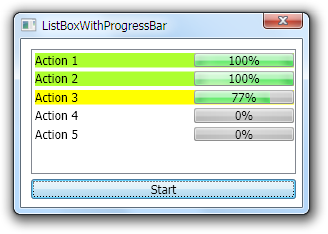
Создайте новой WPF-приложение (с названием ListBoxWithProgressBar), переименуйте главное окно в WndMain, добавьте на форму ListBox (измените свойство HorizontalContentAlignment на Stretch) и добавьте следующий шаблон элемента:
|
1 2 3 4 5 6 7 8 9 10 11 12 13 14 15 16 |
<ListBox.ItemTemplate> <DataTemplate> <!-- Создаем грид с двемя колонками --> <Grid Margin="0,2" Background="{Binding BackColor}"> <!-- Длина второй колонки равна 100 пикселям, а первой - оставшаяся длина --> <Grid.ColumnDefinitions> <ColumnDefinition Width="*" /> <ColumnDefinition Width="100" /> </Grid.ColumnDefinitions> <TextBlock Text="{Binding Title}" /> <ProgressBar Name="PbStatus" Grid.Column="1" Minimum="0" Maximum="100" Value="{Binding Progress}"/> <!-- Добавляем блок с текстом на ProgressBar для отображения процентов --> <TextBlock Grid.Column="1" Text="{Binding ElementName=PbStatus, Path=Value, StringFormat={}{0:0}%}" HorizontalAlignment="Center" VerticalAlignment="Center" /> </Grid> </DataTemplate> </ListBox.ItemTemplate> |
Думаю, все ясно 🙂 Создаем грид с двумя колонками, в первую добавляем блок с текстом, во вторую прогресс бар с текстовым блоком (который будет отображать проценты). С помощью Binding мы осуществляем привязку к полям класса ListBoxDataItem (который будет описан ниже).
Вот весь код главного окна (также была добавлена кнопка старта):
|
1 2 3 4 5 6 7 8 9 10 11 12 13 14 15 16 17 18 19 20 21 22 23 24 25 26 |
<Window x:Class="ListBoxWithProgressBar.MainWindow" xmlns="http://schemas.microsoft.com/winfx/2006/xaml/presentation" xmlns:x="http://schemas.microsoft.com/winfx/2006/xaml" Title="ListBoxWithProgressBar" Height="203" Width="297" WindowStartupLocation="CenterScreen" ResizeMode="NoResize" Closing="Window_Closing"> <Grid> <ListBox x:Name="LbActions" HorizontalAlignment="Left" Height="125" Margin="10,10,0,0" VerticalAlignment="Top" Width="265" HorizontalContentAlignment="Stretch"> <ListBox.ItemTemplate> <DataTemplate> <!-- Создаем грид с двемя колонками --> <Grid Margin="0,2" Background="{Binding BackColor}"> <!-- Длина второй колонки равна 100 пикселям, а первой - оставшаяся длина --> <Grid.ColumnDefinitions> <ColumnDefinition Width="*" /> <ColumnDefinition Width="100" /> </Grid.ColumnDefinitions> <TextBlock Text="{Binding Title}" /> <ProgressBar Name="PbStatus" Grid.Column="1" Minimum="0" Maximum="100" Value="{Binding Progress}"/> <!-- Добавляем блок с текстом на ProgressBar для отображения процентов --> <TextBlock Grid.Column="1" Text="{Binding ElementName=PbStatus, Path=Value, StringFormat={}{0:0}%}" HorizontalAlignment="Center" VerticalAlignment="Center" /> </Grid> </DataTemplate> </ListBox.ItemTemplate> </ListBox> <Button x:Name="BtnStart" Content="Start" HorizontalAlignment="Left" Margin="10,140,0,0" VerticalAlignment="Top" Width="265" Cursor="Hand" Click="BtnStart_Click"/> </Grid> </Window> |
Теперь перейдем к написанию логики.
Добавим классу формы 2 переменные:
|
1 2 |
private string[] _actions; private Thread _thread; |
Первая — массив элементов ListBox, вторая — поток, в котором будем запускать заполнение прогресс баров.
Далее добавьте класс ListBoxDataItem:
|
1 2 3 4 5 6 7 8 9 10 11 12 13 14 15 16 17 18 19 20 21 22 23 |
private class ListBoxDataItem { public SolidColorBrush BackColor { get; set; } // фон элемента public string Title { get; set; } // текст элемента public int Progress { get; set; } // прогресс public ListBoxDataItem( string title, Color backColor, int progress = 0 ) { this.Title = title; this.BackColor = new SolidColorBrush( backColor ); this.Progress = 0; } public ListBoxDataItem( ListBoxDataItem item, int progress, Color backColor ) : this( item.Title, backColor, progress ) { } public ListBoxDataItem( ListBoxDataItem item, Color backColor ) : this( item.Title, backColor, item.Progress ) { } } |
Добавим метод для заполнения ListBox‘а элементами:
|
1 2 3 4 5 6 7 8 9 |
private void FillListBox() { this.LbActions.Items.Clear(); this._actions = new[] { "Action 1", "Action 2", "Action 3", "Action 4", "Action 5" }; foreach ( string action in this._actions ) { this.LbActions.Items.Add( new ListBoxDataItem( action, Colors.Transparent ) ); } } |
Создадим обработчик события Window_Closing, который срабатывает во время закрытия окна. В этом обработчике будет прерывать поток, в котором происходит заполнение прогресс баров:
|
1 2 3 4 5 |
// если был создан поток - закрываем if ( this._thread != null ) { this._thread.Abort(); } |
Теперь перейдем к самому заполнению прогресс баров:
|
1 2 3 4 5 6 7 8 9 10 11 12 13 14 15 16 17 18 19 20 21 22 23 24 25 26 27 28 29 30 |
private void Work() { var random = new Random(); for ( int i = 0; i < this.LbActions.Items.Count; i++ ) { var lbItem = this.LbActions.Items[ i ] as ListBoxDataItem; if ( lbItem == null ) { return; } // увеличиваем прогресс do { lbItem = new ListBoxDataItem( lbItem, lbItem.Progress + 1, Colors.Yellow ); lbItem.BackColor.Freeze(); Application.Current.Dispatcher.BeginInvoke( DispatcherPriority.DataBind, new Action( () => this.LbActions.Items[ i ] = lbItem ) ); Thread.Sleep( random.Next( 0, 50 ) ); } while ( lbItem.Progress < 100 ); // делаем цвет текущего элемента зеленым lbItem = new ListBoxDataItem( lbItem, Colors.GreenYellow ); lbItem.BackColor.Freeze(); Application.Current.Dispatcher.BeginInvoke( DispatcherPriority.DataBind, new Action( () => this.LbActions.Items[ i ] = lbItem ) ); Thread.Sleep( 50 ); } } |
Из кода выше видно, что в цикле идем по всем элементам ListBox‘а, приводим их к типу ListBoxDataItem, создаем на основе старых элементов новые, при этом увеличивая значение прогресса на 1 и меняя цвет фона на желтый. Это делаем с задержкой до тех пор, пока прогресс не достигнет 100. Далее меняем цвет текущего элемента на зеленый. И эти действия повторяем для каждого элемента.
И наконец, создадим обработчик клика для кнопки и запустим поток с заполнением прогресс баров:
|
1 2 3 4 5 6 |
private void BtnStart_Click( object sender, RoutedEventArgs e ) { this.FillListBox(); this._thread = new Thread( this.Work ); this._thread.Start(); } |
На этом всё. Можно компилировать и смотреть результат.
Исходники можно взять на GitHub.